 I finished the final piece for the lightbox series. So happy they are done, such a sense of accomplishment. Now I guess I have some lightboxes to make... I also wanted to get maybe one more print done, a solarplate, before the end of the semester in 2 1/2 weeks. We'll see if I make that deadline. The craft frontier needs some attention as well, so I might be sewing for the rest of the week. You can read about those creations at my other blog. I hope you like these last prints, more new works and news to come soon!
Printmaker, Illustrator, Author. See what goes on behind the curtains...
Monday, June 23, 2008
Completed lightbox series
I finished the final piece for the lightbox series. So happy they are done, such a sense of accomplishment. Now I guess I have some lightboxes to make... I also wanted to get maybe one more print done, a solarplate, before the end of the semester in 2 1/2 weeks. We'll see if I make that deadline. The craft frontier needs some attention as well, so I might be sewing for the rest of the week. You can read about those creations at my other blog. I hope you like these last prints, more new works and news to come soon!
Saturday, June 21, 2008
I'm shining today


 Yeah! I finished two more of the lightbox prints today. I am really trying to finish them on time to sumbit them for the Graphica Creativa exhibition in Finland, and have some time to make other prints before the end of the semester mid July. I have one more to go. I am still amazed at how they look when you flick the light on.
I also was printing some cards on the side, and ended up making a handy little holder for small prints. I think I saw a print holder somewhere that was converted from a CD-holder, and this one had the same idea. If you have one lying around, that would work, but since I don't have one, I just cut some slits into a scrap piece of wood and Voila! a drying rack is born.
.
Friday, June 20, 2008
How to built a lightbox
When I started working with the polymer- or solarplates last spring, I figured it would be the cheapest option just to build one. Since there was some trial and error, I figured I would share how I built the one we are using at school now.
The hardest part was figuring out the lights, since there are limited resources here in the "country". (I live about an hour out of Savannah, GA) If you are only going to do smaller plates and have the resources to buy one, get a facial tanning lightunit from ebay or from a supplier. Solarplates need UV light to expose, so the tanning units work great. Then all you do is just build a box around that. Note, regular fluorescent lightbulbs won't work.
I wanted to make a little bit of a bigger unit, to accomodate larger plates, so I built one out of MDF to house two- two lightbulb- ballasts. (total of 4 bulbs) The cost ended up being about $100 for everything.
Shopping list:
MDF
4- 2' blacklights that you can get from your home improvement store or even at Walmart
2- 2 bulb ballasts (Lowes)
Some screws and wood glue
2 hinges
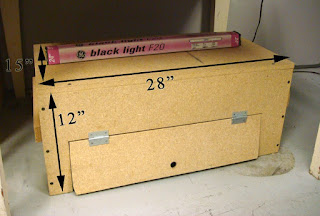 Above. Here is a picture of the finished box with dimensions. I did not wire the cords from the two units together so you have to plug them in separately for now. Addition: You can plug the cords into a surge protector, which makes using them easy, since it has a switch on it.
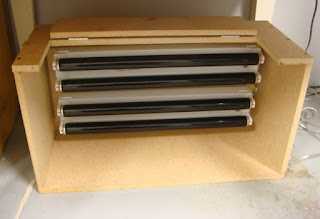
Below. A picture from the inside of the box
Hope this is helpful to you. If you have any questions, please ask.
The hardest part was figuring out the lights, since there are limited resources here in the "country". (I live about an hour out of Savannah, GA) If you are only going to do smaller plates and have the resources to buy one, get a facial tanning lightunit from ebay or from a supplier. Solarplates need UV light to expose, so the tanning units work great. Then all you do is just build a box around that. Note, regular fluorescent lightbulbs won't work.
I wanted to make a little bit of a bigger unit, to accomodate larger plates, so I built one out of MDF to house two- two lightbulb- ballasts. (total of 4 bulbs) The cost ended up being about $100 for everything.
Shopping list:
MDF
4- 2' blacklights that you can get from your home improvement store or even at Walmart
2- 2 bulb ballasts (Lowes)
Some screws and wood glue
2 hinges
Above. Here is a picture of the finished box with dimensions. I did not wire the cords from the two units together so you have to plug them in separately for now. Addition: You can plug the cords into a surge protector, which makes using them easy, since it has a switch on it.Below. A picture from the inside of the box
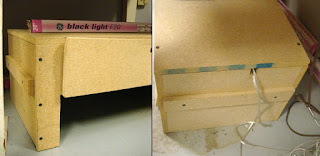
A picture of the sides, the little strips are to make carrying easier. If yo plan on using the unit a lot, you might want to drill a couple of holes on the sides to let some of the heat out.
Hope this is helpful to you. If you have any questions, please ask.
Saturday, June 14, 2008
Working those light boxes


I have been working on these two prints for a while now, and they are done! I have not had the time to fix up a vertical light box, so I had to take 2 of the photos sideways. I really like the way the vertical one turned out. I have three more to do for this series to finish it. I'm also working on some images for solarplates and linocuts.
My work will also be part of a portfolio "Picturing the Beast" organized by Jennifer Jenkins and Curt Bartone. It will be featured as an exhibition at the upcoming Southern Graphics conference in Chicago. Artists selected for the portfolio include Oscar Gillespie, Dale Clifford, Mark Hosford, Eun Lee, Loy McWhirter, Bert Menco, Heather Muise, Ashley Nason, Peter Olson as well as Jenn, Curt and I. So exciting!
Subscribe to:
Posts (Atom)