
For some people it is a mystery what I do, and how a piece of art is created. I finally remembered to keep a camera on me, so here is a little story of how my latest print came to be.
I am currently working on illustrating a book, where the main character is a little Winter Wren. I have been doing some research on the bird and found an interesting tidbit of information that I wanted to share with people. I also wanted to practice drawing wrens before starting with illustrating. So that's where the idea came from.
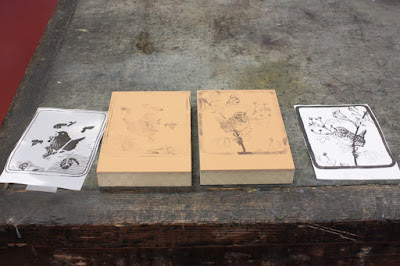
Making the Image and the Blocks. I looked through my own photos and through some online for reference for vegetation and birds. Then I had to figure out size- I wanted to make something small, so 4"x5" it was... I came with a sketch of the basic composition in my head, and then drew it out on a piece of paper as you can see on the left.
To make the print more interesting, I wanted to make it two colors. To figure out where colors should go, I transferred the original drawing on vellum, and then was able to trace the second color on top of it. When you layer them together you can get an idea of what the final print would look like.

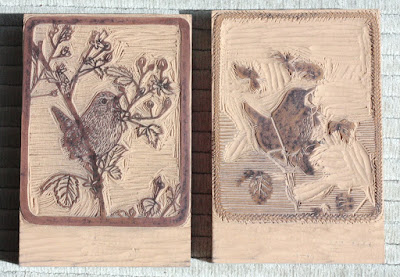
I scanned the ink drawings on the computer, and printed them out on a lazer printer. The images were transferred to linoblocks as I described in my last blogpost. Where after I proceeded to carve them with linocarving tools.
Paper, Ink and Text. Next I figured out what size paper would be best to print on and proceeded to tear big sheets to the right size. For smaller prints, in general it looks nice to have at least two inches of white paper on each side of the printed area. I had to also figure out what colors I wanted to print with and mix ink accordingly. For the text, each letter had to be picked out of a drawer and set in the form you want them to print with. (Sorry I forgot to take a picture of that...)


Printing. I was very excited to print at the letterpress shop at SVC Seattle with an old school Chandler & Price press. It's amazing to think that this press was built about 100 years ago! Wish they built things like that today... For this wren print, I had to print on each sheet of paper three times- first the light color linoblock, then the dark color linoblock, and after that the text with the dark color also. The press also had to be cleaned for each color of ink to print.

Finishing the Edition. Lastly, I could bring my fresh prints home, go through them to toss out all the bad/ misregistered ones, clean out dirty marks and then sign and edition the rest of the prints that made it to the edition.

Now after that being read, aren't you excited about trying printmaking too! You might ask, why would you do that to your self, would it not just be easier to paint a picture. Well, yes and no. Sure, I can paint it, but I absolutely love the physical processes of printmaking. I love carving plates, being worn out after a day of printing, even the never ending challenges when things don't want to work out (trust me there are a LOT of glitches). And as icing on the cake, instead of just one painting at the end of the day, I have a set of prints, that I can sell more affordably, so that many more people can enjoy my art (for sale here).
I found a quote, that describes everything quite well:
"I must confess, I love my press.
For when I print, I know no stint
of joy."
I think I need to have that on a t-shirt...
Next post, I'll write about the last half of the letterpress class at SVC (ref. last posting) and the print that I made for it.
Till then, cheers!